An application’s IIS Logs are suitable for import into NGAGE if they provide detail for the GET requests for pages within the application. For example, NGAGE requires logging of calls to asp, aspx, html or documents to be able to analyze page views and document downloads. Traditional/legacy applications can usually provide this type of detail. Modern REST based applications may struggle to provide a complete picture of usage via the logs alone. In these cases it is often necessary to augment (or replace) the logs with specific event tracking using the REST API. If your application is suitable for IIS Log import the following steps are required:
- Verify that you are logging in the supported format; W3C with all fields checked.
- Create a new Source for the application. For example if your application is a Document Management system, you could choose to call it “Document Management”.
- Setup the root web application URL in the NGAGE Intelligence database.
- Any additional URLs (alternate URLs) found in the IIS Logs should be added to the database too. This ensures all URLs are mapped to the root URL to provide consistent reporting.
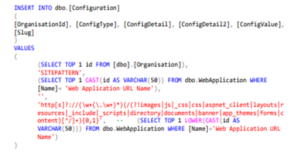
- Setup the Configuration meta-data to define the rules around creating sites from the IIS path data. The creation of Sites within the Web Application provides a richer reporting experience for end users. The Critical columns are:
- configType = SITEPATTERN
- configDetail = WebApplicationID
- configValue = RegEx, using pattern templates below. change the {0,1} to be however many levels you want created; {0,1}=1 level, {0,5}=5 levels, etc.
- Also note that there is an exclude list in the RegEx that can be modified (highlighted). Any pipe separated term defined here will be ignored as a Site name.
‘http[s]?://(\w+(\.\w+)*)(/(?!images|js|_css|css|aspnet_client|layouts|resources|_include|_s cripts|directory|documents|banner|app_themes|forms|content)[^/]+){0,1}’
- Copy the application’s IIS Logs to the NGAGE SSIS file drop location using the supplied PowerShell script on a nightly basis.
- Run the SSIS import.
- Data from the new import will now be visible in the Cube and Reports (subject to filtering).